
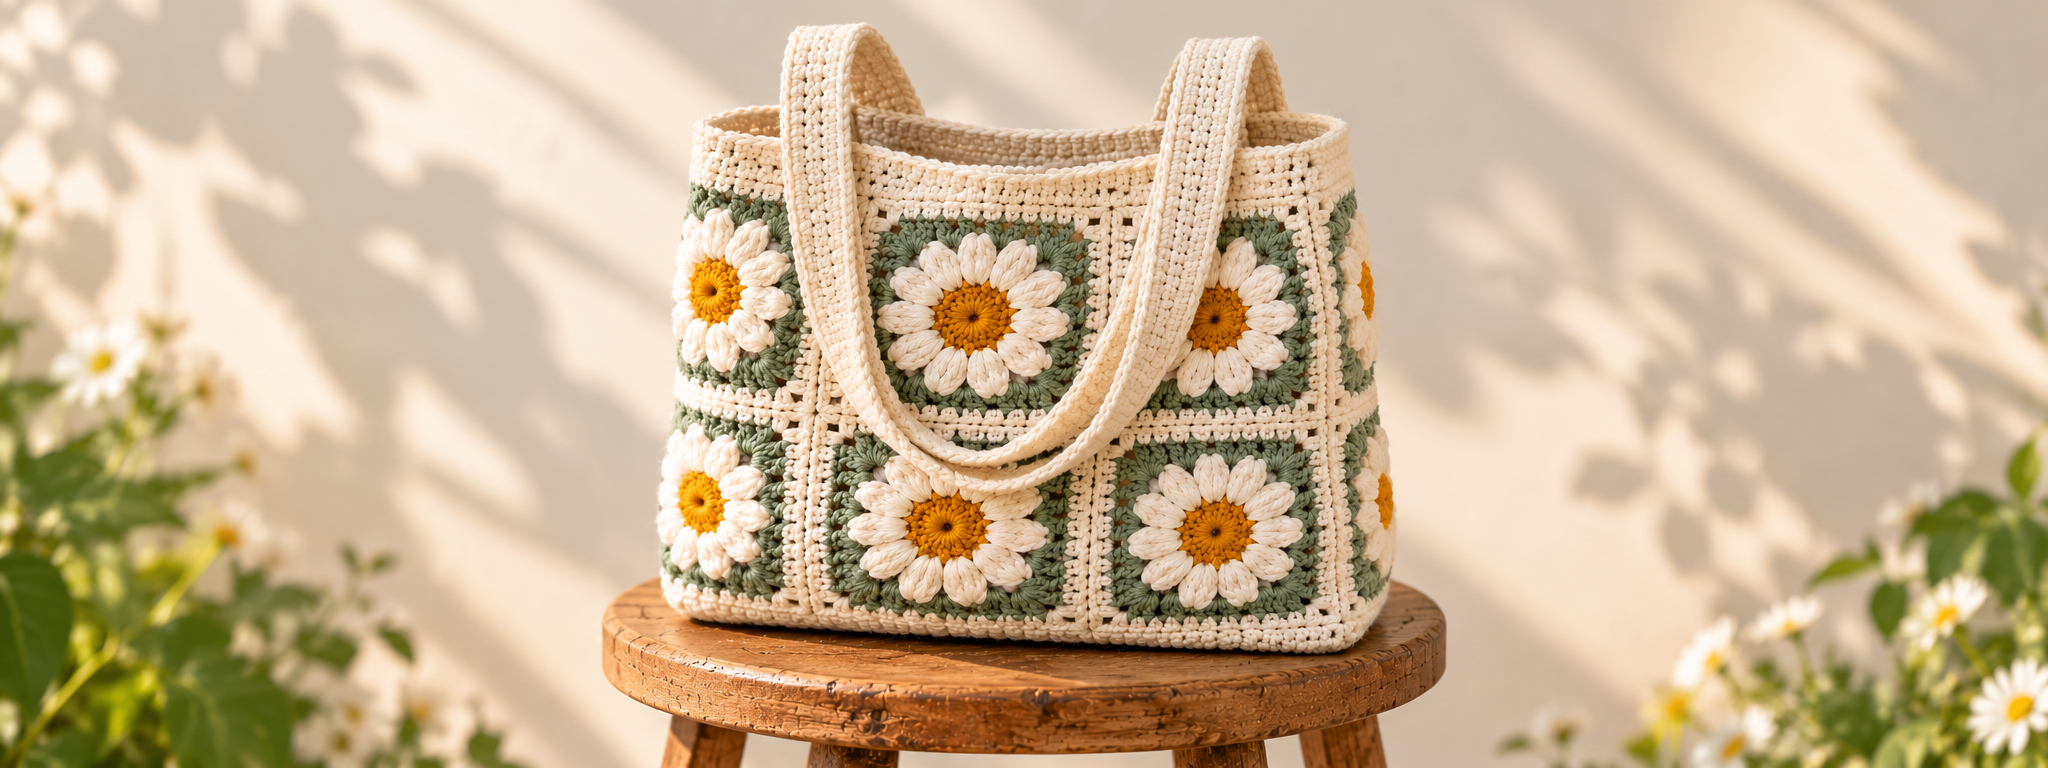
A cream tote covered in white daisies with golden centers and soft sage frames is one of those projects that makes you reach for your hook the moment you see it. It looks fresh, it works with almost any outfit, and because it is built from small granny squares, you can crochet it on the couch, on the bus, or at the park.
The tricky part is finding a pattern that is actually complete and correct. Searching for "daisy granny square bag" turns up dozens of posts, and not all of them are clear, credited, or even the same bag. So instead of guessing, we compared the best real patterns and video tutorials from established designers. This guide shows you which one fits the look you want, what yarn and hooks to use, how the bag goes together, and how to finish it so it holds its shape.
A quick note on patterns. We link to every designer's original page instead of copying their instructions. That keeps you safe from outdated or altered stitch counts, and it makes sure the people who wrote these patterns get credit. Each pattern below was checked on the designer's own page at the time of writing.
Quick overview
- Best for: everyday tote, market bag, beach bag, handmade gift
- Number of squares: 8 to 14, depending on the pattern you choose
- Yarn: worsted-weight (or DK) cotton is the safest choice
- Hook: usually 3.75 mm to 5.5 mm, depending on yarn and designer
- Skills needed: magic ring, double crochet, clusters, color changes, seaming
- Time: several evenings to a couple of weekends, depending on square count
What makes a daisy granny square bag special
A daisy granny square is a small flower motif that finishes into a square, so you can join many of them into one fabric. It is built in three parts: a small center, a ring of petals, and a granny-style frame that squares everything off. Because each square is its own little project, you can swap colors, mix variegated scraps, or stop and start whenever you like.
The photo at the top of this page follows the classic three-color formula. A pale petal color pops against a softer background frame, and a warm yellow center ties it together. You can see how the parts fit in the diagram below.
The color formula
If you want to match the bag in the photo, use three yarn colors for the squares and one extra for the border and strap. Cream is used twice, which is what makes the finished bag look so calm and cohesive.
Which daisy tote pattern should you choose?
There is no single "daisy bag" pattern. Designers have built the same idea in different ways, with different square counts, hook sizes and shapes. This table puts the most useful ones side by side so you can pick before you buy any yarn. All details come from each designer's own page.
| Pattern | Squares | Hook & yarn | Size and notes | Cost |
|---|---|---|---|---|
| Breezy Days Daisy Bag by All About Ami | 13 | 3.75 mm for squares, 2.75 mm for edging; worsted cotton (Lion Brand 24/7 Cotton) | Rated easy. Six-round square with a center, petals and frame in three colors. About 13.5 in wide and tall, 20 in straps. | Free blog post and video; ad-free PDF for sale |
| Granny Square Daisy Tote Bag by Pattern Princess | 8 | 5.5 mm hook; worsted acrylic (Caron Simply Soft) | Rated intermediate. Layered, 3D petals. Bucket-style bag about 17 in across and 9 in deep when laid flat. | Free online; printable PDF for sale |
| Daisy Granny Square Bag by Lisa Auch Crochet | 13 | 5.5 mm hook; DK (light worsted) yarn | Written pattern, tutorial and layout diagrams included. | Free |
| Daisy Granny Square Bag by Annie Design Crochet | 13 | 4 mm hook; leather handles | Five-round square worked in two color layouts. Top edging with attached leather handles instead of crocheted straps. | Free |
| Daisy Granny Square Bag by Sam Bartley Designs | 10 daisy + 3 plain | 5 mm hook; worsted (Lion Brand Basic Stitch) | About 13 in wide and 13 in tall. Mixes daisy squares with plain granny squares. | Free; also on Ravelry (pay what you can) |
| Daisy Granny Square Tote Bag by Crafted by Cat | See listing | 5 mm hook; Aran weight | For advanced beginners. 20 step photos plus an assembly video. | Paid PDF |
Our pick for the look in the photo
For the cream, sage and gold bag at the top of this page, start with the Breezy Days Daisy Bag. It uses the same three-part color roles (a frame color, a petal color and a center color), the designer calls out dense center single crochet for the border and strap so the edges do not stretch, and the strap is built up with extra rounds to make it wider and sturdier. That is very close to the thick, flat handles you see in the photo.
If you prefer fewer squares and a rounder bucket shape, the Pattern Princess tote is a good alternative, with only eight squares to make and a free online version.
One honest caveat: the bag in our photo looks like a styled digital render, so no published pattern is an exact stitch-for-stitch copy of it. The patterns above give you the same look and the same construction ideas, and you can adjust colors, border depth and strap width to match.
Yarn, hooks and tools
Choose cotton for structure
Bags carry weight, so the fabric needs to stay put. Worsted-weight cotton is the most common recommendation: it is sturdy, has little stretch, and shows off petals and clusters clearly. Acrylic works too, and several free patterns use it, but expect a little more sag once the bag is full. Smooth yarns show off the daisy detail better than fuzzy or textured ones.
How much yarn?
Yardage varies a lot between designs. As two real examples, the Breezy Days version lists roughly 353 yards of the frame color, 75 yards of the petal color and 45 yards of the center color for the multi-color bag, while the Pattern Princess version estimates about 150 yards per square. Always check the pattern you pick, and buy an extra skein of the frame color if you can. Dye lots can change between purchases.
Tools checklist
- Crochet hooks in the size your pattern lists (some patterns use a smaller hook for edging)
- Tapestry needle, ideally with a bent tip for seaming
- Stitch markers to hold your place when you leave a color waiting
- Scissors and a steamer or spray bottle for blocking
- Optional: a bag organizer insert or fabric lining, and a button or magnetic snap
Video tutorials to watch before you start
Daisy squares are much easier when you can watch the petals form. These videos come from the designers' own YouTube tutorials and from other makers whose full-bag walkthroughs showed up in our research. Watch the first one all the way through before you cast on.
1. Breezy Days Daisy Bag: daisy granny square, strap and finishing
By All About Ami. Shows each round of the square, how to crochet over yarn tails, and how the strap is worked.
2. Retro daisy granny square (right-handed)
By Pattern Princess, linked from her daisy tote page. A left-handed version is available on YouTube.
3. Invisible join for a flat seam
By Pattern Princess. This is the seaming method her eight-square tote uses.
4. Daisy granny square tote bag: squares, assembly and handle
A start-to-finish walkthrough aimed at beginners, covering the squares, putting the bag together and making the handle.
5. Daisy square tote bag for total beginners
A slower, step-by-step option if you are newer to granny squares.
How the bag is built (the general idea)
Every design is a little different, so follow your chosen pattern for exact stitch counts. The overall process, however, is the same in nearly all of them.
- Crochet all the daisy squares. Make every square the same size, and write down your hook size and yarn so you can match later squares if you run out.
- Block them. Light steaming or damp-blocking evens out the stitches and gives you crisp edges, which makes seaming much easier.
- Lay out the squares. Some designs join squares into flat rectangles first; others use a cross or fan layout and then fold sections up to create the sides. Lay everything out on a table before you sew.
- Seam with the wrong sides facing you. A whip stitch or an invisible join gives a flat seam that does not form a ridge on the front. Use a long length of yarn so you do not have to join new strands partway along.
- Work the top edging. Single crochet evenly around the opening. For a firm, ribbed-looking border like the one in the photo, switch to a dense stitch such as the waistcoat stitch for a few rounds.
- Make the straps. Straps can be chained and then built up with rounds, worked flat in rows, or replaced with leather handles. Try the bag on before you finish, and remember it will hang lower once it is full.
- Weave in the ends. A daisy square has several color changes, so weave each tail in more than once and in different directions so nothing works loose.
Pro tips for a sturdier, neater bag
Crochet over your tails
Every color change leaves a yarn end. Crocheting over the tail as you work the next round saves a lot of weaving at the end and makes the back of the square tidier.
Keep your tension consistent
Petals are the first place uneven tension shows. If your clusters look loose, drop to a smaller hook for the daisy rounds only. Use the gauge in your pattern as a starting point, and measure one finished square before making the rest.
Add structure inside
A fabric lining is the classic fix for stretch. If you do not want to sew, a ready-made bag organizer insert gives you a zipper closure and pockets and takes the load off the crochet. One designer even notes that a medium organizer fits her bag exactly.
Use a button or snap
A simple button loop or a magnetic snap at the center top keeps the bag closed on windy days. The Pattern Princess tote uses a three-quarter-inch button with a corner chain space as the buttonhole.
Block the finished bag
After assembly, relax the fibers with a gentle steam or damp-block, paying attention to the seams and the straps. It evens out the stitches and gives the bag a store-bought finish.
Color ideas beyond cream, sage and gold
- All one color: make every round in a single cream or ecru for an elegant, texture-only look. Some designers explain how to work the squares without cutting yarn between rounds.
- Sunset daisies: gold, rust and pumpkin frames with sage centers, like the autumn version on the Pattern Princess page.
- Soft pastels: blush, butter and mint for a spring bag.
- Scrap yarn bag: use leftover cottons for frames and centers and keep the petals one constant color so the bag still looks cohesive.
- Black and white petals: a bold monochrome look with yellow centers.
Common problems and fixes
Squares come out different sizes. Almost always a tension or hook issue. Block them to the same measurement, or pull the smaller ones gently into shape while damp.
Petals look flat. Make sure each cluster is pulled up to the full height of the stitch, and push the petals forward as you work the frame so they sit proud of the background.
Seams are bumpy. Seam with the wrong sides facing you, and match stitch for stitch along each edge rather than eyeballing it.
The strap stretches. Use cotton, work the strap in a dense stitch, and make it wider rather than longer. A wide, flat strap spreads the weight better than a thin one.
Colors bleed in the wash. Test bright or dark cotton yarn for color fastness before you start, especially if cream will sit next to a saturated shade.
Caring for your crochet tote
Check the yarn label first. Cotton is usually machine washable on a gentle cycle in a mesh bag, then reshaped and dried flat. Acrylic bags can be hand washed. Avoid hanging a wet bag by its straps, since the weight can stretch them out of shape. Spot clean when you can, because less washing means longer life.
Frequently asked questions
How many granny squares do I need for a daisy tote bag?
It depends on the design. Published patterns range from 8 squares for a bucket-style tote to 13 or 14 squares for larger totes and backpacks, so check the pattern you choose before buying yarn.
What yarn is best for a crochet tote bag?
Worsted-weight cotton is a popular choice because it is sturdy, has little stretch and shows stitch definition well. Acrylic works too, but the bag may sag more when it is full.
Is a daisy granny square bag good for beginners?
If you can already make double crochet and clusters, yes. Some designers rate their version easy, while others rate theirs intermediate because of layered petals, so watch the video tutorial first and pick the version that matches your comfort level.
How do I stop my crochet tote from stretching?
Use cotton yarn, a slightly smaller hook for the strap, and dense stitches such as the waistcoat (center single crochet) stitch. A fabric lining or bag organizer also takes strain off the crochet.
Can I sell bags made from these patterns?
Each designer sets their own terms. Many allow sales of finished items if you credit the designer and link to the original pattern, but always read the licence on the pattern page first. Do not reprint or share the written pattern itself.
Credits and sources
All patterns belong to their designers. Details in this guide come from the following pages, which we encourage you to visit:
- Breezy Days Daisy Bag by Stephanie Lau, All About Ami
- Granny Square Daisy Tote Bag by Pattern Princess
- Daisy Granny Square Bag by Lisa Auch Crochet
- Daisy Granny Square Bag by Annie Design Crochet
- Daisy Granny Square Bag by Sam Bartley Designs
- Daisy Granny Square Tote Bag by Crafted by Cat
Final thoughts
A daisy granny square tote is a perfect mix of cute and practical. Pick a pattern that matches your skill level, watch the square video once through, and make a single test square before committing to the whole bag. Once you see that first daisy bloom, the rest goes quickly. If you enjoy flower projects, you may also like our Crochet Cotton Flower Pattern, and our guide on how to stuff amigurumi without lumps is handy for your next small project.