
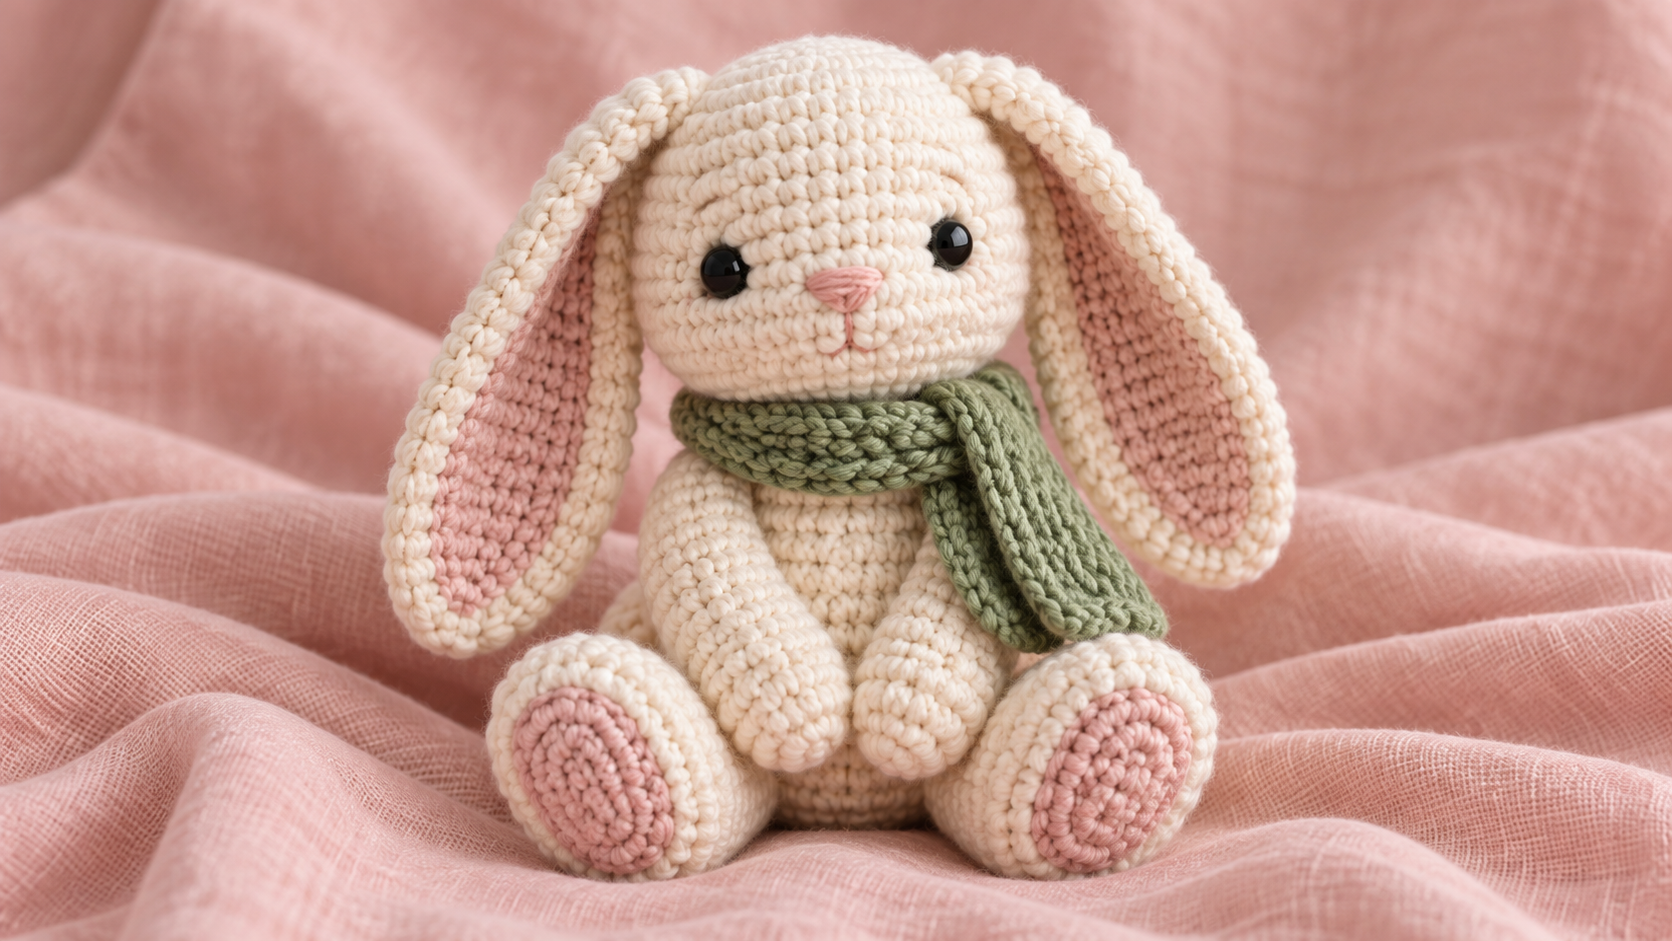
A small cream bunny with long floppy ears, a tiny pink nose and a sage-green scarf is about as cozy as amigurumi gets. It also looks harder than it is. Underneath the charm, this is a classic toy: a round head, a plump body, two ears, two arms and two feet, all worked in simple single crochet. The real challenge is finding a pattern that is complete and clearly written. We compared real free bunny patterns and tutorials from established designers so you can start with confidence.
About these patterns. Designers own their patterns, and several forbid reprinting them. So we link to each original page instead of copying stitch counts. You get accurate instructions, and the creators get the credit.
Quick overview
- Size: from about 3 inches (tiny) to 8 inches (plush), depending on yarn and hook
- Skills: magic ring, single crochet, increase, decrease, sewing pieces together
- Time: a few hours for a small bunny
- Yarn: cream, a little pink, and sage green for the scarf
What makes this bunny so cute
Four details create the look. First, chubby sitting proportions: a round head, a rounded body and feet placed at the front. Second, long ears that hang down and frame the face. Third, a small, low face with wide-set eyes and a tiny nose, which reads as "baby". Fourth, the scarf, which adds color and personality. Get these right and almost any basic bunny pattern will turn out charming.
Best bunny patterns compared
No single pattern matches the photo exactly. These free options are the closest, and all details come from each designer's page.
| Pattern | Size and materials | Notes |
|---|---|---|
| Tiny Bunnies by Kristi Tullus | About 3 in tall (4¾ in with straight ears); DK yarn, 2.5 mm hook, 8 mm eyes | Beginner. Separate head, body, arms and legs. Floppy or straight ears. |
| Mimi the Bunny by DIY Fluffies | 3 in in cotton (2.5 mm hook) or 8 in in chenille (5 mm hook) | Beginner. Full video tutorial. About 2–3 hours. |
| Lop-Eared Bunny by Amigurumi Today | About 6.7 in sitting; plush worsted yarn, 4 mm hook, 12 mm eyes | Easy. Soft, squishy shape. Free online version; PDF for sale. |
| Bobo the Bunny by Craft Passion | 11.5 in body, 17 in with ears | Upright or floppy ears from the same pattern. |
| Floppy Ear Bunny by Spin a Yarn Crochet | Super bulky yarn, 5 mm hook, 14 mm eyes | Ears made from two panels in contrasting colors, a handy trick for pink inner ears. |
Our pick: start with Tiny Bunnies. It builds the head, body, arms and legs as separate pieces, just like the bunny in the photo, and the floppy ears are sewn on low at the sides of the head.
Materials you will need
Choose smooth yarn in cream, a small amount of pink, and a contrasting green for the scarf. Cotton or cotton blends give crisp stitches, while velour or chenille gives a plusher look. Use a hook at least one size smaller than the yarn label recommends. Tight stitches stop stuffing from showing through. You will also need polyester fiberfill, safety eyes (8 mm suits a 3-inch bunny, larger for bigger ones), embroidery floss for the nose, a yarn needle, pins and a stitch marker.
Video tutorials
Watching the first few rounds makes the magic ring and decreases much easier. Start with the first video.
1. Mimi the Bunny full tutorial
By DIY Fluffies. Includes how to sew on the nose.
2. Beginner-friendly crochet bunny plush
A step-by-step "doudou" style bunny for newer crocheters.
3. Cute bunny without a magic ring
Good if the magic ring frustrates you.
4. Easy crochet bunny rabbit
Part 1 of a full tutorial. Look for part 2 on the same channel.
How to get the look in the photo
Floppy ears. Leave the ears unstuffed, or fill them very lightly, so they drape. Sew them to the sides of the head with a long tail and pin them first so they hang evenly.
Pink inner ears. Sew a small flat oval of pink felt or crochet onto the inside of each ear, or use a contrasting panel as Spin a Yarn Crochet does.
Sitting pose. Sew the feet at the front of the body so the bunny tips back and sits. Place the arms low, just under the head.
Face. Keep the eyes low and wide apart, then embroider a small triangle nose in pink. For rosy cheeks, add a few pink stitches, or dab a little dry cosmetic blush with a cotton swab.
The scarf. Chain a length that wraps loosely around the neck, then work three or four rows of half double crochet in green. Add short yarn fringe at the ends if you like. Test the length on your bunny before fastening off, and tack it in place with a few stitches.
Common mistakes
Stuffing shows through. Drop a hook size. Lumpy head. Fluff the filling and add it in small pinches, as in our guide to stuffing amigurumi without lumps. Wobbly head. Sew through the whole stitch, all the way around, and add a little extra filling before closing the seam. Crooked ears. Pin both ears and check from the front before sewing.
Safety note
Safety eyes are not recommended for children under three. For babies and toddlers, embroider the eyes with black yarn instead and sew every piece on very securely.
Frequently asked questions
Is an amigurumi bunny good for beginners?
Yes. It uses single crochet, increases, decreases and a magic ring, which are the core amigurumi skills. Several designers rate their bunnies beginner-friendly.
What size hook should I use?
Use a hook at least one size smaller than your yarn label suggests, so the fabric stays tight.
Should floppy ears be stuffed?
No. Leave them unstuffed or very lightly filled so they stay soft and hang naturally.
Can I make the bunny bigger or smaller?
Yes. The same pattern works with finer or bulkier yarn and a matching hook. Remember to scale the eye size too.
Credits
Patterns by Kristi Tullus, DIY Fluffies, Amigurumi Today, Craft Passion and Spin a Yarn Crochet. Enjoy your bunny, and see our daisy granny square tote for your next project.